Shock Control Test Advanced Tutorial
Complete Step-by-Step Guide for Running a Shock Control Test
Spectral Dynamics Panther Control System
Modern Vibration Test Control System
Section 1: INTRODUCTION & SAFETY OVERVIEW
⚠ CRITICAL SAFETY WARNING: Shock testing produces extremely high instantaneous accelerations (50-10,000+ g) and forces. A single misplaced bolt or improperly mounted accelerometer can result in equipment destruction, flying debris, and serious personnel injury. This tutorial emphasizes safety at every step.
About This Tutorial
This comprehensive tutorial provides detailed, step-by-step procedures for conducting classical shock vibration tests using the Spectral Dynamics Panther Shock Control system. Every procedure, parameter, and safety consideration is explained in detail to ensure successful, safe testing.
Panther Shock Control represents over 50 years of Spectral Dynamics innovation in transient waveform control. From the first digital vibration controller in 1969 to today's state-of-the-art Panther system, Spectral Dynamics has continuously advanced the technology that protects your test articles and delivers accurate, repeatable shock test results.
What is Shock Testing?
Shock testing subjects a Device Under Test (DUT) to a transient acceleration event - typically a single pulse or series of pulses lasting milliseconds. Unlike continuous vibration (sine or random), shock events are discrete, high-amplitude, short-duration accelerations that simulate handling drops, transportation impacts, or operational shocks.
Shock testing answers critical questions:
- Will the product survive a drop from packaging height?
- Can electronics withstand handling during installation?
- Will aerospace components survive pyrotechnic separation events?
- Does packaging provide adequate protection?
- What is the damage threshold and safety margin?
- Where are structural weak points?
Critical Safety Considerations for Shock Testing
⚠ DANGER: Shock testing is the most hazardous form of vibration testing. Peak accelerations can reach 1000+ g with forces exceeding 100,000 lbf instantaneously. Component or fixture failure can launch debris at high velocity.
Unique Hazards of Shock Testing:
- Extremely high peak accelerations (50-10,000+ g possible)
- Instantaneous forces with no warning or ramp-up
- Violent motion - fixture or DUT can become projectile
- No time to react once shock pulse initiated
- Cumulative damage - each shock weakens structure
- Resonance amplification can multiply input by 10× or more
MANDATORY Safety Requirements:
- ALL personnel trained in shock testing before operating
- Safety barriers or shields REQUIRED for >100g tests
- Minimum 10-foot clear zone around shaker
- Safety glasses MANDATORY
- Emergency stop button accessible and tested
- Never leave shock test unattended
- Inspect ALL mounting hardware before EVERY shock
- Use stud-mounted accelerometers for >50g shocks
- Verify force limits calculated correctly
- Start at reduced amplitude (25-50%) for initial characterization
Panther Superior Safety Capability: Panther Shock Control uses ultra-high-speed acquisition up to 262,144 samples/second with 24-bit resolution - capturing complete shock pulse detail with <4 microsecond time resolution. This is 10-50× faster than competitive systems. Panther performs comprehensive pre-test validation BEFORE executing each shock, calculating expected peak force and verifying safety limits.
Section 2: PRE-TEST SAFETY INSPECTION
⚠ MANDATORY: This inspection checklist must be completed before EVERY shock test. A single overlooked item can result in equipment destruction or injury.
Step 2.1: Shaker System Physical Inspection
Foundation and Mounting Verification:
☐ All foundation bolts present and torqued
☐ No cracks in foundation
☐ Armature moves freely through full stroke
☐ No binding or roughness detected
☐ Head expander (if used) properly mounted
☐ All fasteners present with lock washers
Step 2.2: Fixture Inspection:
☐ ALL mounting holes occupied with proper fasteners
☐ Grade 8 bolts recommended for shock
☐ Torque verified with calibrated wrench
☐ No cracks or damage visible
☐ Fixture weight documented
Step 2.3: DUT Mounting
⚠ CRITICAL: DUT mounting failure is the most common cause of shock test failures.
☐ DUT positioned correctly per test procedure
☐ ALL mounting fasteners present and torqued
☐ DUT cannot rock or shift when tested manually
☐ No overhang beyond fixture support
☐ DUT weight documented
Step 2.4: Accelerometer Installation
⚠ CRITICAL: Use stud mount for ALL shocks >50g. Adhesive mounting unreliable for high-g shock.
Accelerometer mounting is THE most critical measurement consideration. High-g shocks create enormous forces on the sensor. A 100g shock on a 20-gram sensor creates 44 pounds of force on that tiny sensor.
- Select mounting location with flat surface
- Tap hole to proper thread size (10-32 or 1/4-28 typical)
- Install mounting stud with anti-seize compound
- Torque stud: 20-30 in-lbs for 10-32
- Thread accelerometer onto stud
- Torque accelerometer per manufacturer spec (10-30 in-lbs typical)
- Install safety wire for >200g shocks
- Verify sensor oriented correctly
- Route cable with strain relief
Step 2.5: Clearance Verification
Shock pulses create significant displacement. Calculate expected displacement and verify adequate clearance.
Formula (Half-Sine): Displacement = (Amplitude × Duration²) × 386.4 / (π² × 4)
Example: 100g, 11ms
Displacement = (100 × 0.011²) × 386.4 / 39.48 = 0.118 inches
Require 2× safety factor: 0.24 inches minimum clearance
☐ Calculate expected displacement
☐ Apply 2× safety factor
☐ Verify clearance in shock direction
☐ Minimum clearance: Greater of 2× calculated OR 2 inches
☐ Check lateral clearance (1 inch minimum)
Section 3: SYSTEM STARTUP & HARDWARE VERIFICATION
⚠ CRITICAL: Never power on amplifier before Panther system is ready. Incorrect sequence can cause DC offset damage to shaker.
Step 3.1: Power-On Sequence
MANDATORY SEQUENCE - Follow exactly:
- Verify amplifier is OFF
- Power on Panther hardware modules
- Wait 30 seconds for initialization
- Launch Panther Shock Control software
- Verify "Hardware Connected" status (green indicator)
- Create new test or open existing (.csk file)
- Enable IEPE power for accelerometer channels (if external)
- Wait 5 seconds for sensor stabilization
- Verify DC level 10-12V (proper IEPE operation)
- Power on amplifier (last step)
- Wait for amplifier warm-up (1-2 minutes)
- Verify amplifier green "Ready" status
NOTE: Shock does not have an online mode to perform this process. Use online mode in Analyzer if needed.
Step 3.2: Channel Signal Verification
- Using GTX, add time history plot for each channel
- Observe baseline signal (<0.01g expected)
- Gently tap fixture near each sensor
- Confirm signal spike for each channel
- Verifies sensor mounted, connected, responding
Section 4: CHANNEL CONFIGURATION
Step 4.1: Understanding Channel Types
Control Channel (One Only):
- Primary measurement for shock pulse
- System drives to match target on this channel
- Mounted on shaker head or fixture near DUT
- Most representative of desired input
- Classical shock uses single control channel
Measurement Channels (Monitor Only):
- Record response at other locations
- NOT used for control - recording only
- Up to 31 additional channels possible
Step 4.2: Enable Channels
Navigate: Setup → Channels
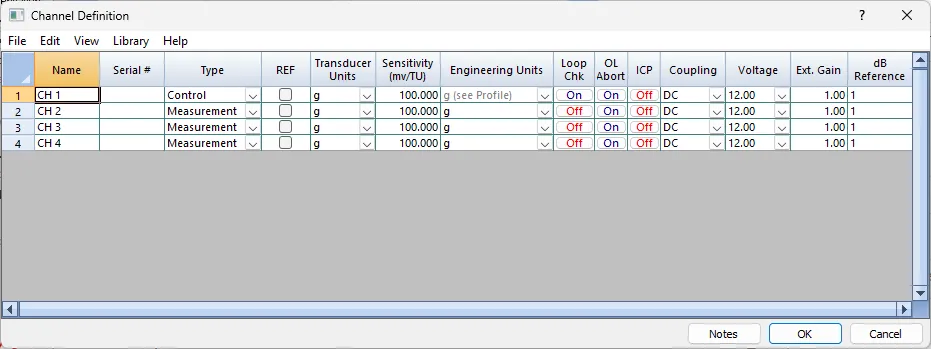
- Change Type to "Control for Channel 1
- Enter descriptive name: "Control_Shaker_Head_Z"
- Enable additional measurement channels as needed
- Name clearly: "DUT_Mount_Point_Z", etc.
Step 4.3: Enter Accelerometer Sensitivities
⚠ CRITICAL: Incorrect sensitivity causes incorrect shock amplitude. 10% error = 10% amplitude error.
Accelerometer sensitivity is output voltage per unit acceleration (mV/g).
Example: 10 mV/g sensor at 100g outputs 1000 mV = 1.0 Volt
Typical ranges:
Low-g: (0-100g): 50-100 mV/g
Medium-g: (0-500g): 5-20 mV/g
High-g: (0-10,000g): 0.5-5 mV/g
- Obtain calibration certificate for EACH sensor
- Note sensitivity value (mV/g)
- For each enabled channel:
- Enter sensitivity in "Sensitivity" field
- Double-check entry (typos common)
- Typical values: 0.5 to 100 mV/g7.
- Document sensor serial numbers
- Match sensor to channel
Step 4.4: Configure IEPE Power
IEPE sensors require constant current power (4 mA) through signal cable.
Configuration:
- Check "IEPE Power" for each sensor channel
- Set "Coupling" to AC (required for IEPE)
- Wait 5 seconds for stabilization
- Verify DC level 10-12V
Step 4.5: Set Voltage Range
Calculate required range:
Peak Voltage = Peak Acceleration (g) × Sensitivity (mV/g) / 1000
Example: 500g shock, 5 mV/g sensor
Peak Voltage = 500 × 5 / 1000 = 2.5V
Select ±5V range (next higher with headroom)
Recommendation:
- Development: Use "Auto" range
- Production: Calculate and set fixed range with 2× margin
Panther Superior Capability: Panther's 24-bit ADCs provide >110 dB dynamic range on every range. Even on ±12V range, Panther resolves <20 microvolts. Competitive 16-bit systems (96 dB) lose resolution on wide ranges.
Section 5: PULSE PARAMETERS & COMPENSATION
Step 5.1: Selecting Test Type
Under Panther main menu, Select Test → "Classical Shock"
Classical shock defines pulse by shape, amplitude, and duration. System creates ideal mathematical pulse and compensates for hardware response.
Navigate: Setup → Classical Profile → Pulse Parameters tab
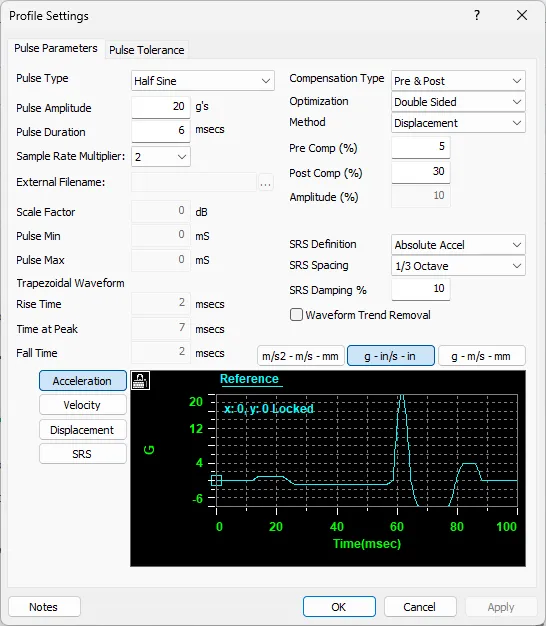
Step 5.2: Select Pulse Shape
Half-Sine Pulse (MOST COMMON):
- Smooth sinusoidal rise and fall
- Simulates dropped impacts, cushioned collisions
- Gentlest on equipment
- MIL-STD-810 Method 516 standard
- Recommended for first-time characterization
Terminal Peak Sawtooth (TPS):
- Linear rise to peak, instantaneous fall
- Most severe classical pulse
- Navy shipboard standard (MIL-S-901)
- Use with extreme caution
- NOT recommended for initial characterization
Amplitude Entry:
Locate "Pulse Amplitude" field. Enter target peak acceleration in g. For initial test, enter 25-50% of final target.
Step 5.3: Set Pulse Duration
Duration is time width in milliseconds (ms).
Typical Effects:
• Frequency content: Shorter = higher frequencies
• Displacement: Longer = more displacement
• Energy: Amplitude × Duration
Dominant frequency ≈ 1 / (2 × Duration)
Example: 11ms → 45 Hz dominant
Common values: 3, 6, 11, 15, 18 ms
MIL-STD-810: Typically 11ms
Duration Entry: Locate "Pulse Duration" field, enter in milliseconds.
Understanding Pulse Compensation
Real shaker systems don't respond perfectly to input signals. Compensation adjusts the drive waveform to account for shaker, amplifier, and fixture dynamics, producing accurate pulses at the control point despite hardware imperfections.
Compensation adds pre-pulse and post-pulse components that:
- Cancel fixture oscillation after main pulse
- Pre-condition fixture before main pulse
- Minimize residual vibration
- Achieve specification compliance
Step 5.4: Select Compensation Type
Compensation Type Options:
- Pre & Post Pulses (Recommended): Lowest compensation amplitudes, longer total duration, best for most applications
- Pre-pulse Only: Use if no excitation prior to main pulse allowed, measures residual effects accurately
- Post-pulse Only: Accurate measurement of residual resonance, less common
Select "Pre & Post Pulses" for standard testing.
Step 5.5: Select Optimization Method
- Single Sided: Displacement limited to one direction, conservative approach
- Double Sided (Recommended): Displacement both directions, best utilization of shaker stroke
Step 5.6: Select Method
- Displacement (Recommended): Best for utilizing shaker displacement, compensation produces balanced positive/negative displacement
- Symmetric Accel: Equal amplitude and duration before/after main pulse
- Non-Symmetric Accel: Post-pulse twice pre-pulse amplitude, shorter duration
Step 5.7: Compensation Amplitude
Pre-Comp / Post-Comp Amplitude: Percentage of main pulse (5-100%)
Typical Settings:
- Pre-Comp: 30-50%
- Post-Comp: 30-50%
Higher percentages provide better compensation but require more displacement. Start with 40% for both, adjust if needed.
Step 5.8: SRS Parameters
Shock Response Spectrum (SRS) parameters define post-test analysis:
SRS Definition:
- Absolute Acceleration (most common)
- Relative Displacement (less common)
SRS Spacing:
- 1/3 Octave (standard for most specifications)
- 1/6 or 1/12 Octave (higher resolution)
SRS Damping:
- 5% (Q=10) most common
- Range: 0.1% to 99%
- Higher damping = lower SRS values
For MIL-STD-810: Use Absolute Acceleration, 1/3 Octave, 5% damping
Configuration:
- Select "Absolute Accel" for SRS Definition
- Select "1/3 Octave" for SRS Spacing
- Enter 5% for SRS Damping
- These settings match most specifications
Section 6: PULSE TOLERANCE SETUP
Navigate: Setup → Classical Profile → Pulse Tolerance tab
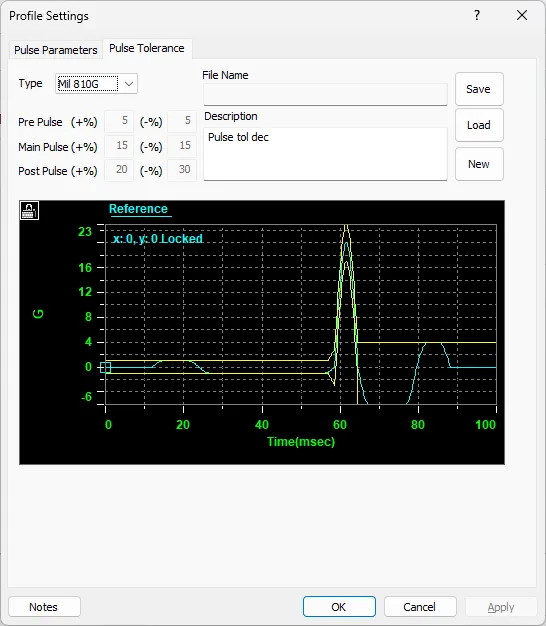
Understanding Pulse Tolerance
Pulse tolerance defines acceptable deviation from ideal pulse shape. During testing, Panther compares actual pulse to target and determines pass/fail based on these criteria.
Tolerance applies to:
- Pre-pulse amplitude
- Main pulse amplitude
- Post-pulse amplitude
- Pulse duration
- Overall pulse shape
Step 6.1: Select Tolerance Type
- MIL-STD-810 (Recommended for Compliance): Predefined tolerances per military standard, use for MIL-STD testing
- Custom: User-defined tolerances, use for non-military specifications or tighter control
Step 6.2: MIL-STD-810 Tolerances (If Selected)
MIL-STD-810 Method 516 specifies:
Main Pulse Tolerance:
- +10% / -10% amplitude
- ±20% duration
Pre-Pulse and Post-Pulse:
- ±25% of pre/post amplitude limits
These cannot be changed when MIL-STD-810 selected.
Step 6.3: Custom Tolerances (If Selected)
If "Custom" selected, configure individual tolerances:
| Parameter | Typical Value | Range |
| +Main Pulse % | +10% | 5-100% |
| -Main Pulse % | -10% | 5-100% |
| Pre/Post Pulse % | ±25% | 5-100% |
Step 6.4: Tolerance Philosophy
Tolerance Selection Guidelines:
Tight Tolerances (±5-10%):
- Development testing
- Characterization work
- Requires excellent control
- More iterations may be needed
Standard Tolerances (±10-15%):
- Production testing
- Qualification testing
- Good balance of control and efficiency
Loose Tolerances (±20-30%):
- Screening tests
- Go/no-go testing
- Faster execution
Recommendation: Start with ±10% for most applications. Tighten to ±5% for critical development work. Loosen to ±15-20% only if control difficulties arise.
Section 7: SCHEDULE CONFIGURATION
Navigate: Setup → Schedule
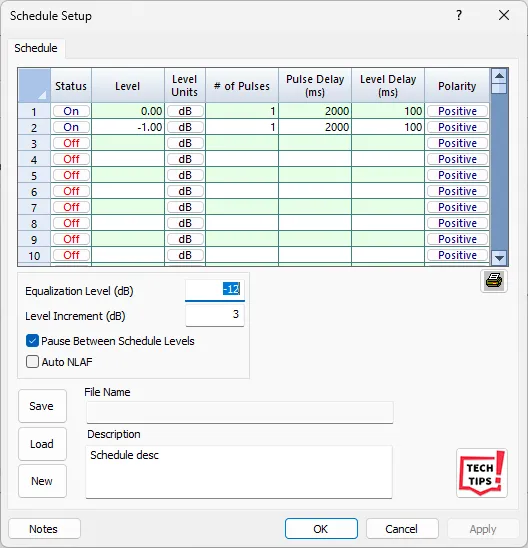
Understanding Test Schedules
A schedule defines the sequence of shocks to be executed:
- Amplitude levels
- Number of pulses at each level
- Pulse polarity (positive or negative)
- Delays between pulses
- Delays between groups
Schedules enable automated testing with level progression and allow systematic documentation of test execution.
Step 7.1: Create Schedule Table
Schedule table has the following columns:
- Level (dB): Amplitude in dB relative to reference (0 dB = full amplitude, -6 dB = 50%)
- Number of Pulses: How many shocks to execute at this level
- Polarity: Positive or Negative pulse direction
- Pulse Delay (s): Time between individual pulses (seconds)
- NLAF: Non-Linear Adjustment Factor (typically 1.0)
- Pause: Pause before next level (requires operator action)
Step 7.2: Example Schedule for 100g Characterization
| Level (dB) | # Pulses | Polarity | Pulse Delay | Purpose |
| -12 | 3 | Positive | 5 sec | Equalization (25g) |
| -6 | 3 | Positive | 10 sec | Verification (50g) |
| -3 | 3 | Positive | 10 sec | 75g intermediate |
| 0 | 3 | Positive | 10 sec | Full level (100g) |
Step 7.3: dB Level Conversion
dB levels are relative to full reference amplitude:
0 dB = 100% of reference
-3 dB ≈ 71% of reference
-6 dB = 50% of reference
-12 dB = 25% of reference
-20 dB = 10% of reference
Formula: Amplitude = Reference × 10^(dB/20)
Examples (100g reference):
-12 dB: 100g × 10^(-12/20) = 100g × 0.251 = 25.1g
-6 dB: 100g × 10^(-6/20) = 100g × 0.501 = 50.1g
0 dB: 100g × 10^(0/20) = 100g × 1.0 = 100g
Step 7.4: Adding Schedule Rows
- Click "On" button to enable row
- Enter Level in dB
- Enter Number of Pulses (1-1000)
- Select Polarity (Positive or Negative)
- Enter Pulse Delay in seconds (0-1000)
- Leave NLAF at 1.0 unless non-linearity observed
- Check "Pause" if operator verification needed before next level
- Repeat to add more rows
Step 7.5: Non-Linear Adjustment Factor (NLAF)
NLAF compensates for shaker non-linearity between equalization level and test level.
When to Use:
- Large step from equalization to test level (>12 dB)
- Observed consistent under/over-shoot at test level
- Long-stroke shakers (airbag testing)
How it Works:
After equalization at low level, first pulse at test level may be low due to gain change. NLAF scales compensation by observed ratio.
Example:
Equalize at -12 dB, jump to 0 dB
First pulse measures 90g instead of 100g (10% low)
Set NLAF = 1.1 for next test
System applies 10% gain correction
Typical Values: 0.8 to 1.2
Leave at 1.0 unless non-linearity confirmed
Step 7.6: Schedule Execution Parameters
- Equalization Level: -12 dB typical, can use -20 dB for extra safety
- Level Increment: Step size for automatic progression (1-20 dB), use 3-6 dB typical
- Pause Between Levels: Requires operator click to continue, good for inspection between levels
Section 8: SAFETY LIMITS CONFIGURATION
⚠ CRITICAL: Safety limits are your last line of defense. This section is MANDATORY. Improper configuration has destroyed shakers and injured personnel.
Navigate: Setup → Limits
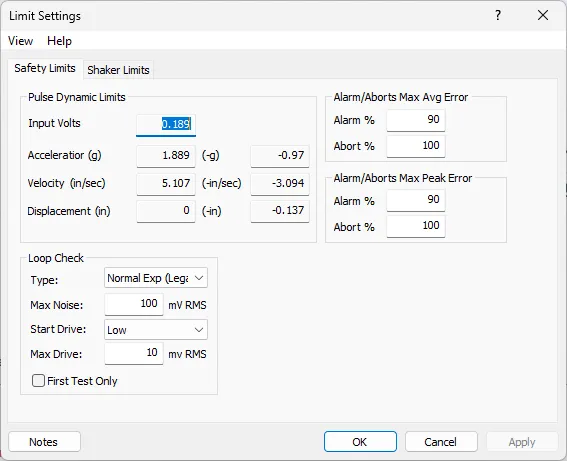
Step 8.1: Configure Safety Limits Tab
Safety limits protect against over-testing and equipment damage. Panther monitors multiple parameters continuously and takes action if limits exceeded.
Alarm vs Abort
- Alarm: Warning displayed, test continues, operator notified
- Abort: Test stops immediately, output disabled, requires operator intervention
Step 8.2: gRMS Limits
gRMS (RMS acceleration) provides overall energy monitoring.
Typical Settings:
- Alarm: +3 dB above expected level
- Abort: +6 dB above expected level
These limits catch unexpected high-energy events.
Step 8.3: Loop Check Parameters
- Type: Normal (recommended) or Rigorous
- Max Noise: Maximum ambient noise in mV RMS, typical: 10-50 mV
- Max Drive: Maximum drive voltage during loop check, typical: 2-5V
Step 8.4: Alarm/Abort Error Criteria
Max Average Error: Average deviation across entire pulse
- Typical: 10% alarm, 20% abort
Max Peak Error: Maximum instantaneous deviation
- Typical: 15% alarm, 30% abort
Peak errors naturally higher at pulse boundaries.
Step 8.5: Shaker Limits Tab (MANDATORY)
⚠ MANDATORY: Force limit configuration is REQUIRED. Exceeding shaker force rating causes catastrophic failure.
Understanding Force Limits
Shock generates peak forces that can be 100× higher than continuous vibration.
Force Calculation:
Force (lbf) = Total Moving Mass (lb) × Peak Acceleration (g)
Total Moving Mass Includes:
- Shaker armature
- Head expander (if present)
- Slip Table
- Drive Bar
- Mechanical Support
- Test Object
Step 8.6: Force Limit Configuration Procedure
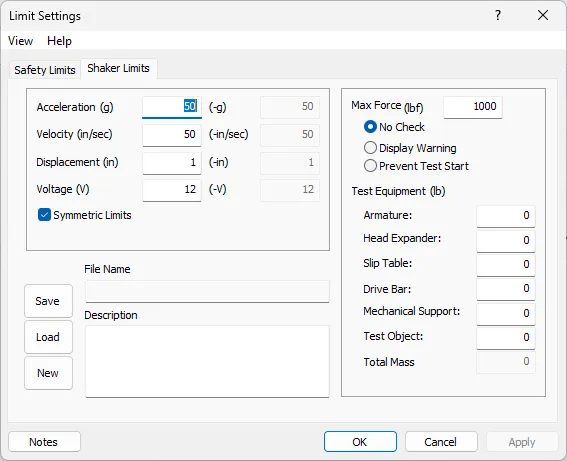
- Click "Shaker Limits" tab
- Obtain shaker rated force from specification
- Apply safety factor: 75-80% for shock
- Enter safe force limit in "Max Force (lbf)" field
- Select "Prevent Test Start" in Max Force Check dropdown
- This provides absolute protection
- Enter all Test Equipment masses
- System calculates Total Mass automatically
- System calculates Max Safe Acceleration
- Verify Max Safe ≥ Test Amplitude
- If Max Safe < Test Amplitude: CANNOT RUN
- Must reduce mass, level, or use larger shaker
- Document all measurements
Step 8.7: Displacement Limits
Enter shaker maximum displacement in:
- +Displacement (in) - positive direction
- -Displacement (in) - negative direction
Typical values: 0.5 to 4.0 inches depending on shaker size
System warns if calculated pulse displacement exceeds limits.
Step 8.8: Velocity and Acceleration Limits
- Max Velocity: Shaker maximum velocity (in/sec), prevents over-velocity
- Max Acceleration: Absolute acceleration limit (g), typically 2× test level
- Max Voltage: Amplifier input limit (V), typically ±10-12V
Check "Symmetric Limits" to make negative limits equal positive.
Panther Superior Capability: Panther performs pre-test validation BEFORE each shock. System calculates expected force, displacement, velocity, and voltage, then verifies against limits. If any would be exceeded, Panther prevents execution and displays specific warning - protecting equipment before damage occurs.
Section 9: SYSTEM IDENTIFICATION & LOOP CHECK
Understanding System Identification
System ID characterizes the complete shock test system - shaker, amplifier, fixture, and DUT response. This measures the transfer function H(f) between drive output and control response.
The transfer function accounts for:
- Shaker frequency response
- Amplifier gain and phase
- Fixture dynamics
- Mounting characteristics
- Sensor response
With H(f), Panther creates pre-compensated drive waveforms producing accurate pulses despite hardware characteristics.
System ID Process
- Low-level characterization pulses (-12 to -20 dB)
- Measure drive and response simultaneously
- Calculate transfer function H(f) frequency-by-frequency
- Create pre-compensated drive waveform
- Output test pulse and measure response
- Compare actual vs target
- Update H(f) if needed (iterative convergence)
- Proceed when tolerance met
Step 9.1: System ID Execution
System ID executes automatically when test starts. Monitor progress in test control panel and log window.
Typical Sequence:
- "Starting Loop Check" - Verifies connections
- "Loop Check Complete" - System ready
- "Starting System ID" - Initial characterization
- "Measuring Transfer Function" - H(f) calculation
- "System ID Complete" - Ready for pulses
- "Starting Equalization" - Low-level verification
- "Equalization Pulse 1 of N" - Iterative refinement
- "Equalization Complete" - System converged
- "Ready for Pulse Outputs" - Full-level testing ready
Total time: 2-5 minutes typical
Step 9.2: Monitoring System ID
- Watch log window for progress messages
- Green "OK" messages indicate success
- Yellow "Warning" messages may appear (usually OK)
- Red "Error" messages require attention
- Observe GTX for pulse shapes if open
- System ID pulses visible as small amplitude events
- Coherence must be >0.90 for good H(f)
- Low coherence indicates noise or loose connection
Step 9.3: System ID Parameters
Navigate: Setup → System Identification
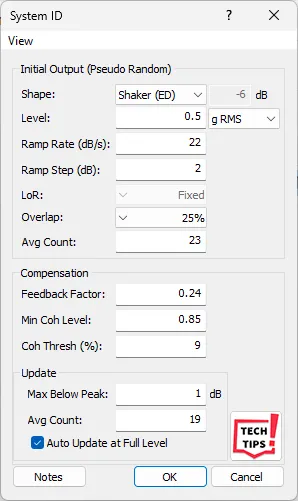
- Equalization Level: -12 dB typical, use -20 dB for extra safety, lower = more iterations
- Number of Averages: 4-8 typical, more = better H(f) but slower
- Coherence Threshold: 0.90 typical, minimum coherence for valid H(f)
- Feedback Gain: 0.25-0.50 typical, controls adaptation speed
Step 9.4: Troubleshooting System ID
| Problem | Solution |
| Low coherence | Check connections, reduce noise, increase drive level |
| No convergence | Reduce feedback gain to 0.25, lower equalization level |
| Oscillation | Lower feedback gain, check for resonances in fixture |
| Timeout error | System needs more time, increase iteration limit or averages |
Panther Superior Capability: Panther uses proprietary adaptive equalization algorithms with transfer function updating and coherence smoothing to compensate for non-linearities and time-varying dynamics. The system iteratively converges to accurate pulse reproduction faster than competitive systems, minimizing test time and cumulative damage to DUT.
Section 10: SHOCK TEST EXECUTION
⚠ CRITICAL: Once shock initiated, pulse executes in milliseconds. No time to react. Final safety check is MANDATORY before pressing Start.
Step 10.1: Pre-Execution Final Safety Check
☐ All Section 2 inspection items completed
☐ All channels configured and verified
☐ Test parameters entered correctly
☐ Schedule created and verified
☐ Safety limits configured and force calculation verified
☐ Test area cleared, minimum 10 feet
☐ Safety glasses on all personnel
☐ Emergency stop accessible
☐ Visual inspection: nothing loose, no debris
☐ Ready to proceed
Step 10.2: Start Test Sequence
- Click "Start" button in Test tab in ribbon panel
- System performs automatic pre-test checks
- Log window displays status messages
- "Test Started" - Initialization begun
- "Measuring Ambient Noise" - Baseline measurement
- Ambient noise displayed for each channel
- "Starting Loop Check" - Connection verification
- "Loop Check Complete" or "Loop Okay"
- "Starting System ID" - Transfer function measurement
- Low-level characterization pulses output
- "System ID Complete" - H(f) calculated
- "Starting Equalization" - Low-level convergence
- Equalization pulses executed at -12 dB or configured level
- "Equalization Complete" - System ready
- "Ready for Pulse Outputs" button becomes active
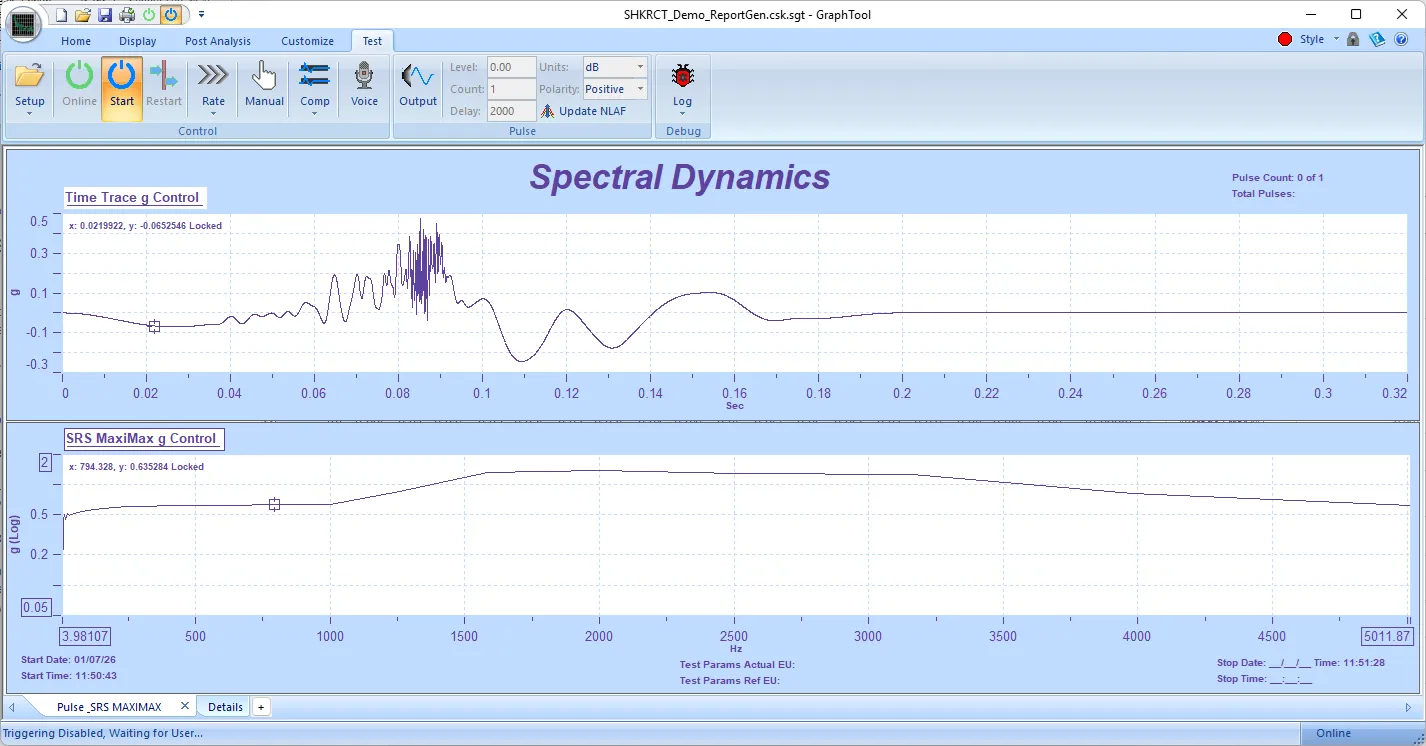
Step 10.3: Pulse Output Execution
When "Ready for Pulse Outputs" button active:
- Click "Output" button to execute schedule
- Or operate in Manual Mode for individual pulses
Automatic Mode (Recommended):
- System executes complete schedule automatically
- Progresses through levels as configured
- Pauses if "Pause Between Levels" checked
- Continues until all pulses completed
Manual Mode:
- Check "Manual Mode" in Test Control
- Operator controls each parameter
- Set Level, Number of Pulses, Pulse Delay, Units and Polarity manually
- Click "Output" for each group
- Provides maximum control but slower
Step 10.4: Monitoring During Execution
- Maintain visual contact with shaker/fixture
- Watch for any unusual motion or vibration
- Listen for abnormal sounds
- Monitor log window for warnings
- Observe real-time plots if GTX is open
- Green "Pass" or Red "Fail" displayed after each pulse
- Pass: Pulse within tolerance
- Fail: Pulse exceeded tolerance (investigate)
- Hand on emergency stop throughout test
- NEVER leave test unattended
Step 10.5: Post-Pulse Inspection
⚠ MANDATORY: Inspect after EVERY shock pulse, especially during characterization.
Pause test after each pulse (use schedule pause feature)
Visually inspect:
- DUT condition (no visible damage)
- Mounting hardware (no loosening)
- Fixture (no cracks or deformation)
- Accelerometer mounting (still secure)
- Cables (no damage or disconnection)
- Gently test mounting by hand (should be rigid)
- If any concerns: STOP and investigate
- Document observations
- Continue only if setup verified safe
Step 10.6: Emergency Procedures
- Emergency Stop Activated: Press red emergency stop button if ANY abnormality observed, output stops immediately, do NOT restart until cause identified
- Alarm Triggered: Warning displayed, test may continue or pause depending on settings, investigate cause, verify setup
- Abort Triggered: Test stops automatically, output disabled, red "Abort" message displayed, identify problem before restarting
- Equipment Damage: STOP immediately, secure test area, photograph damage, document conditions, notify supervisor
- Personnel Injury: STOP immediately, render first aid if qualified, call for medical help, secure area, document incident
Step 10.7: Test Completion
- All schedule pulses executed
- "Test Complete" message displayed
- System returns to idle state
- Final data saved automatically
- Perform final post-test inspection (Section 12)
- Proceed to data review
Section 11: POST-TEST PROCEDURES & DATA REVIEW
Step 11.1: Immediate Post-Test Actions
- Leave shaker powered on for 2-3 minutes (cool-down)
- Do NOT immediately power off amplifier
- Allow electronics to stabilize before shutdown
- Save test data if not auto-saved
- Click File → Save or Save As
- Use descriptive filename with date: "DUT_100g_11ms_20250127.csk"
- Verify data saved successfully
Step 11.2: Final Physical Inspection
☐ DUT condition - any damage, cracks, or failures?
☐ Mounting hardware - any loosening?
☐ Fixture condition - cracks or deformation?
☐ Accelerometers - still properly mounted?
☐ Cables - any damage or stress?
☐ Shaker - any abnormal sounds or feel?
☐ Document all observations
☐ Photograph any damage or concerns
Step 11.3: Data Review - Time History
Review recorded shock pulses:
- Open GraphTool via Panther (View → GraphTool) if not currently running
- Load test data file (.sdd)
- Display time history for control channel
- Verify pulse characteristics:
- • Correct amplitude
- • Correct duration
- • Correct shape
- • Clean baseline before/after pulse
- • No excessive oscillation
- Compare to target pulse (overlay if available)
- Check measurement channels
- Look for unexpected response or resonance
Step 11.4: Pulse Verification Criteria
| Parameter | Typical Tolerance | Check |
| Peak Amplitude | ±10% | Measure peak, compare to target |
| Pulse Duration | ±20% | Measure at 10% amplitude points |
| Pre-pulse | <25% of main | Measure amplitude before main pulse |
| Post-pulse | <25% of main | Measure amplitude after main pulse |
| Baseline | <5% of peak | Check signal before and after pulse |
Step 11.5: System Shutdown Sequence
- Save all data close Panther Shock Control software
- Wait for software to fully close
- Power off amplifier
- Wait 1 minute for amplifier discharge
- Power off Panther hardware modules
- Disconnect any non-permanent cables
- Clean work area
- Complete test log documentation
Step 11.6: Test Documentation Recommendations
- Test date and time
- Operator name
- DUT identification and serial number
- Test specification and procedure reference
- Shaker and fixture identification
- Accelerometer serial numbers and sensitivities
- Test parameters (amplitude, duration, pulse shape)
- Number of shocks executed
- Pass/fail status for each pulse
- Any anomalies or observations
- Data file names and locations
- Photographs of setup
Section 12: DATA ANALYSIS & INTERPRETATION
Step 12.1: Time History Analysis
Time history plots show acceleration vs time for each pulse.
Key Analysis Points:
- Peak amplitude accuracy
- Pulse shape fidelity
- Duration compliance
- Pre/post pulse levels
- Baseline stability
- Unexpected resonances
Use GraphTool cursors to measure specific values:
- Right-click on plot
- Select "Add Cursor"
- Drag to desired location
- Read values in cursor window
Step 12.2: Shock Response Spectrum (SRS)
SRS represents shock severity across frequency range. Shows peak response of single-degree-of-freedom systems at various natural frequencies.
SRS Analysis:
- In GraphTool, select pulse data
- Click "Calculate SRS" or Analysis → SRS
- SRS curve displays frequency vs peak acceleration
- Compare to specification limits if applicable
SRS Interpretation:
- Higher SRS = more severe shock at that frequency
- SRS peaks indicate dominant frequencies in pulse
- Use for comparing different shock pulses
- Essential for aerospace and defense testing
Step 12.3: Multi-Channel Comparison
Compare control channel to measurement channels:
- Overlay multiple channel time histories
- Observe amplitude differences
- Note phase relationships
- Identify amplification (DUT response > input)
- Typical fixture/DUT amplification: 2-5×
- Amplification indicates resonance excitation
Critical: If DUT response significantly exceeds input, reduce test level or modify mounting to avoid resonance.
Step 12.4: Transfer Function Analysis
Transfer function shows how DUT responds vs input across frequency range.
Calculation:
TF(f) = DUT Response(f) / Control Input(f)
Values >1.0 indicate amplification
Values <1.0 indicate attenuation
Use to identify:
- DUT resonant frequencies (TF peaks)
- Critical modes needing damping
- Frequency ranges of concern
- Mounting effectiveness
Step 12.5: Data Export (if applicable)
- Select Data Convert in GTX (if available)
- Select SDD as source.
- Select export format:
- • ASCII (.txt, .dat) - universal compatibility
- • UFF (.uff) - universal file format for FEA
- • MATLAB (.mat) - MATLAB processing
- Choose channels to export
- Choose functions and records
- Specify output filename
- Click Export
Section 13: TROUBLESHOOTING GUIDE
Common Problems and Solutions
| Problem | Cause | Solution | ||
| Pulse amplitude low | Insufficient compensation, low drive | Increase drive, re-run System ID, check amplifier gain | ||
| Pulse amplitude high | Excessive compensation | Reduce NLAF if used, re-run equalization | ||
| Pulse shape distorted | Fixture resonance, inadequate compensation | Modify fixture, increase compensation amplitude, use longer duration | ||
| Excessive oscillation after pulse | Under-damped fixture, insufficient post-compensation | Increase post-comp amplitude, add damping, modify fixture design | ||
| No convergence during equalization | Low coherence, fixture instability | Reduce feedback gain to 0.25, increase averages, check mounting | ||
| Pulse duration incorrect | Timing error, pulse definition issue | Verify duration entry, check sample rate, re-define pulse parameters | ||
| Control signal loss abort | Loose cable, sensor disconnected | Check all connections, verify IEPE power, inspect cable for damage | ||
| Force limit exceeded | Mass too high for amplitude | Reduce test amplitude, reduce fixture mass, or use larger shaker | ||
| Displacement limit exceeded | Duration too long for amplitude | Reduce amplitude, reduce duration, or use longer-stroke shaker | ||
| Inconsistent pulse-to-pulse | Thermal drift, mounting loosening | Allow warm-up time, check mounting torque, verify fixture stability |
Systematic Diagnosis Procedure
1. Document exact symptoms (save screenshots)
2. Review test log for error messages
3. Check all physical connections
4. Verify all configuration parameters
5. Repeat loop check and System ID
6. Test at lower amplitude if possible
7. Isolate variable: change one thing at a time
8. Consult Panther documentation
9. Contact technical support if needed: 800.778.8755
Section 14: PANTHER SUPERIOR CAPABILITIES SUMMARY
Panther Shock Control provides industry-leading capabilities that ensure safe, accurate shock testing. This section summarizes the technological advantages highlighted throughout this tutorial.
Ultra-High-Speed Acquisition
- 262,144 samples/second maximum rate
- <4 microsecond time resolution
- Captures complete pulse detail
- 10-50× faster than competitive systems
- 250+ samples per 1ms pulse
- No transient detail missed
- Competitive 50 kHz systems: only 50 samples per 1ms
24-Bit ADC Resolution
- >110 dB dynamic range on all channels
- Resolves <20 microvolt signals
- Captures baseline noise AND high-g peaks simultaneously
- No compromise between range and resolution
- Auto-ranging without data artifacts
- Competitive 16-bit systems: 96 dB range, forced trade-offs
- Adaptive Equalization
Proprietary algorithms for accurate pulse reproduction
- Transfer function updating during test
- Coherence-based adaptation
- Compensates for non-linearities
- Handles time-varying dynamics
- Minimizes iterations required
- Reduces cumulative DUT damage
- Patented by Spectral Dynamics
Pre-Test Validation
- Calculates expected values BEFORE shock execution
- Peak force prediction
- Displacement calculation
- Velocity estimation
- Voltage requirement check
- Verifies against configured limits
- Prevents dangerous configurations
- Protects equipment before damage occurs
- Competitive systems: execute first, discover problems after
Comprehensive Safety Monitoring
- Multi-layer safety architecture (6 independent layers)
- Real-time monitoring at 262 kHz rate
- Over-level protection on all channels
- Automatic abort on limit violation
- Control signal loss detection
- Hardware watchdog
- Emergency stop override
- Pre-test force limit verification
- Linear-Phase Synthesis Filters
For SRS Shock Synthesis:
- Phase-accurate waveform generation
- No phase distortion across frequency range
- Accurate SRS matching
- Complex transient reproduction
- Industry-leading SRS control accuracy
Complete data traceability
- Gap-Free Streaming: Real-time streaming to disk
- No gaps or missed samples
- Independent sample rates per channel
- Complete test documentation
- Long-duration recording capability
- Ideal for compliance testing
Technical Specifications Summary
| Specification | Check |
| Input Channels | 8 standard (expandable to 32) |
| ADC Resolution | 24-bit |
| Dynamic Range | >110 dB |
| Max Sample Rate | 262,144 samples/second |
| Frequency Accuracy | ±5 ppm |
| Output DAC | 20-bit |
| Max Output | ±12V peak |
| Amplitude Accuracy | ±0.20% of value or ±0.03% FS |
CONCLUSION
This comprehensive tutorial has provided detailed, step-by-step procedures for conducting classical shock vibration tests using Panther Shock Control. Safety has been emphasized throughout due to the extreme forces and instantaneous nature of shock testing.
Key Takeaways:
✓ Always complete pre-test inspection before EVERY shock
✓ Start at reduced amplitude (25-50%) for characterization
✓ Verify force limits BEFORE testing - calculation is MANDATORY
✓ Use stud-mounted accelerometers for >50g shocks
✓ Monitor test continuously - NEVER leave unattended
✓ Inspect after EVERY shock pulse
✓ Trust Panther's adaptive equalization and pre-test validation
✓ Document all parameters, masses, and observations
For Additional Assistance:
Technical Support: 800.778.8755 or
Training courses available - contact for schedule
